B359 – THE CANON MACRO LENS, WORTH IT?

So today I had more of a play with the Canon 100mm f/2.8 L series Macro Lens, its basically a lens that can magnify objects close up and give you a view of something that the human eye might not necessarily be able to see. Now the lens RRP is around £900 which for a Canon L series Lens isn’t really too bad, its like of a mid price lens and something that I think every photographer should at least have access too, its a great lens to have a play with and is the perfect lens to just pull out the camera bag one day and mix your photography game up abit

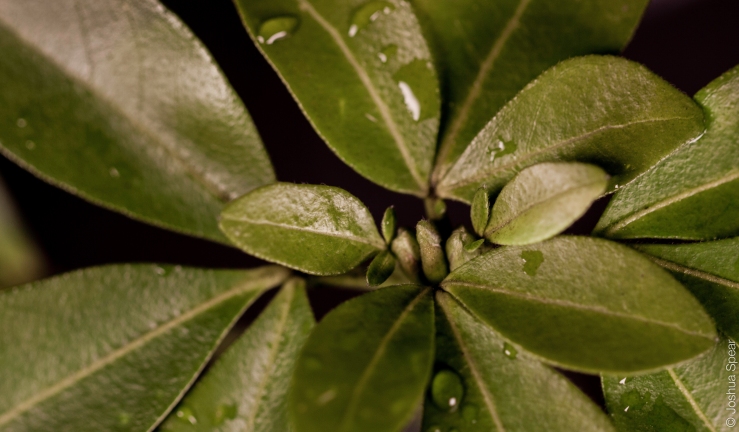
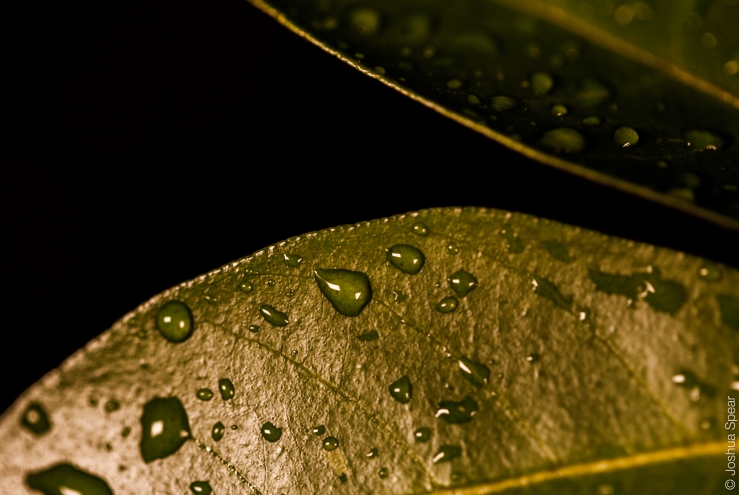
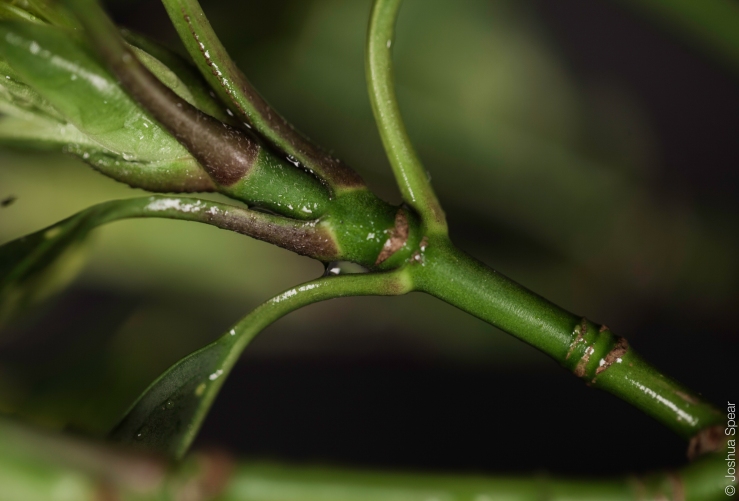
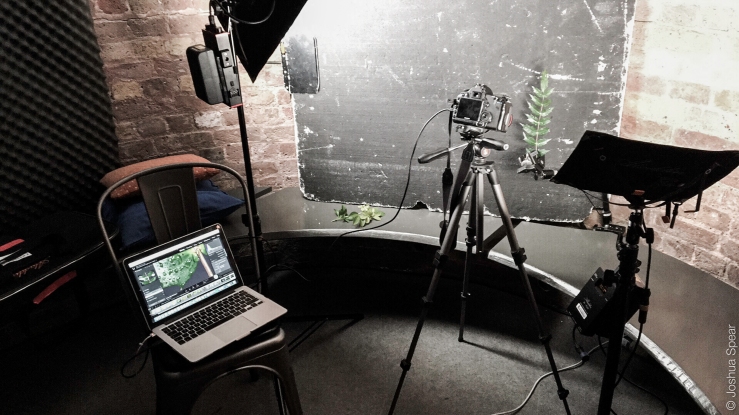
For this review I decided to do it as fair as possible, so I set up some lights and created a kind of mini studio, with a black bounce board and a magic arm to hold up the object. My plan was then to tether my laptop to the camera and after each shot go through the image and work out if I was happy with the point of focus. I wanted an object that had different textures and something that no matter how close you could get you would always discover more and more detail, my object of choice was trimmings off the plants out the front of the office.

My idea was to shoot with both a high ISO and also bring the ISO right down and use the shutter speed to control the light, and because I was using a Tripod I could now minimise camera shake. for those that don’t know the ISO is basically something that you make higher for low light conditions and decrease for well lite shots, my idea was to use a high ISO and a fast shutter speed to see how that effected the shot, and I definitely lost detail when close up and in full Macro mode, it made the shots a lot more “grainy” but once I lowered both the ISO and shutter speed, I noticed that my photos were a lot smoother and the level of detail had gone up ten fold. I was now capturing light in even the darkest areas of each photo but because I was shooting with an amazing lens, I could pull focus on the areas I wanted too and blur completely out areas I didn’t think added anything to the photo.

I also have to agree with canon that an aperture of 2.8 is probably right and thing lower and the depth of field would become way to shallow. At the same time I wouldn’t mind seeing what a 100mm macro would look like with an aperture of f1.8, I know that would be very shallow but that mixed with something like a medium format camera would mean you could see even more than the human eye. Anyone out there heard of a f1.8 100mm macro?

All in all this is a great and lens and something that really mixes up not just my photography game but photography in general. Its a lens that I would love to add permanently to my lens collection and something that I think will help me to improve the overall look of my future photos.

B359-1-4
– this is a photo I wanted to take and show the whole head of the leaf and show how the focal length handles a wider shot –
B359-1-2
– close up, Im pretty happy with this but if I had a higher megapixel camera I would definitely would have cropped in further –
B359-1
– shooting something thats been out in the rain means I get to see how the macro lens handles reflections and contrast, I really think this lens is worth £900! –
B359-1-5
– This was my set up for this shot, probably the most effort Ive ever put into shooting a leaf –

B352 – EDITING PHOTOS

As I’m writing a fair bit about my photography techniques, then I though one good thing to touch on for todays post is how I edit my photos. The main piece of software that I use is a program called Adobe Lightroom, I think its one of the best programs out there for editing loads of photos at once, in fact I cant really think of a different program out there that might be just as good, to me it seems like Adobe have this corner of the market locked down.

What I tend todo with my photos is import all the stills I took that day into Lightroom, literally its just a drag and drop thing and then start working my way through the photos. one thing that I have noticed with my editing is that I like to play around with the highlight tool a lot and play around with the exposure. i start by going from one extreme to the other, playing with the dials on the right hand side going up and down the dial till I get to a point where my happy with the photo. once Ive played around with the lighting, I then move onto the colour in the photo and because this is an iphone photo, the White balance is auto so I cant really play with that,  but the saturation, vibrance and clarity can all be messed about with. The clarity is something I don’t really like to change to much, I find that it makes a photo too grainy or too blurry and I normally use it a lot more if a photo is out of focus, kind of like a safety net. Saturation and vibrance are something I normally like to bring down, i love taking colour of the photos and give them that faded look and if you have read some of my previous blog posts you will have read the reason why I like faded photos so I wont go into those details now, just read some of my previous post and im sure you will see why.

I hope thats helped you to quickly understand what I do to my photos and maybe if you guys want to know more I can do a more in detailed post about this.

heres my examples and also some print screens of the editing process.

B352-1
– a less saturated photo, really wanted the smoke to blend in to the sky –
SATURATED_V2
– have a look at the setting to the right, look at where the saturation and vibrance dials are –
B352-1-2
– this is just a black and white photo –
B352-1-3
– not a big fan of high contrast street photos but thought I would show you want it looks like –
HIGH_CONTRAST -
– I tried to keep the tone settings basically the same as the saturated photo and then just change the presences settings –

B342 -THE STORY BEHIND THE PHOTOS.

As this post is being written and photos are being edited, I am sat next to a bin on a floor, while travelling on a busy train back to London, as the person next to me is watching Marley and Me on his Iphone without the use of headphones. So its pretty difficult to keep positive and stop myself from standing up and politely asking him to watch something a bit more up beat. I mean who watches Marley and Me on a train journey?

Anyway, apart from this current situation today day has actually been pretty chilled out and that’s how a Sunday should be spent, chilling, sleeping and eating. Firstly I should say congratulations to Amy, It fell on her shoulders today to cook up her speciality breakfast for everyone which is kind of like baked Spanish eggs and its one of my favourite breakfasts. She smashed it and everyone thought it was a great little dish.  I did mean to take a photo of the dish but I think its fair to say that everyone just dug in before I even remembered to grab a photo, so sorry about that. I think I’ve posted the recipe before but if anyone wants it, let me know and ill track it down. Its really simple but yet effective way of getting ready for what ever the day throws at you.

After all that Amy and me decided to get some fresh air and head down to the beach for a little walk, and what walk is complete without my best friend the Canon 5d. we didn’t go that far but it was the perfect conditions to take some fun pictures. I feel that my photography style is changing so much at the moment and Ive gone from wanting bright blue sky’s and a strong sunny day, to loving the over cast flat lighting that we have been having recently. It really adds a completely different element to each shot.

My plan recently has also been to use a lot paler colours, as most of you know I love black and white photos they always look so strong, but at the same time just saturating photos to the point where they feel black and white but still have hints of colour mixed with my favourite nifty 50mm lens just feels right at the moment.

What do you guys think about de-saturated photos, do they work? I feel like if you leave the white tones over exposed and keep the shadows to a minimum then it really feels like you capture a moment in time but then add some extra style to almost help create a story behind the shot. Its something that I feel just works kind of perfectly at the moment, maybe its just this time of year and that it all change in a few months, but for now I’m really happy with this kind of weather (By the way this is my Sunday night rush hour train thought process, so if non of it makes sense to you, just check out my photos and see if that helps make it any clearer).

Hope your all having a good Sunday! Oh and Happy Mothers day mum, you’re card will be there tomorrow. Sorry its late!

B342-1-3
– walking along the beach, didnt notice the bird sat on the post at the end till I started editing it –
B342-1-2
– amy going for that country sheek –
B342-1
– breakfast ingredients –

B133 – This is what I think: SleekLens

The other day a company called SleekLens got in touch with me and asked if I would try out there PreSets for Light room and let them know what I think. Long story short it’s a quick way for you to edit photos on Lightroom, without having to adjust the exposure or contrast. This is something I’ve been thinking about for a while, is it a way for me to save time editing photos, will it help to improve my blog?

SleekLens asked me to try the Presets on Landscape photography, so the best thing for me to do was head over to Hampstead Heath early on Saturday morning and see what I could capture and see how good these Presets are.

Sleek Lens sent me the Through The Woods Presets, which are aimed at Landscape Photography. I wont go on any more, Ill let my photos do the talking.

_MG_7264
– before the Preset is Applied –
TtW|2-Exposure- Darken Shadows-1
– using the TtW|2-Exposure- Darken Shadows-1 – I’m pretty happy with the colours of this photo, but my favourite part of this photo is the shape of that tree, it looks like a proper tree. if you get what I mean and the colour helps to define that –
_MG_7477
– before a filter is applied –
TtW|1 - Base - High Dynamic Range 2-1
– using the TtW|1 – Base – High Dynamic Range – my main focus was shooting in photo with a high aperture, to help bring out the cloud in the back ground, then because im shooting RAW, i will be able to bring the the tree up i n Lightroom, and was basically me testing to see if the Presets could do that and I can tell you that they can –
_MG_7521
– Before a Preset is applied –
TtW|1-Base - Monochrome Fantasy-1
– using the preset – TtW|1-Base – Monochrome Fantasy – I wanted to see how good the black and white presets were and what better thing to test this preset on than a white focal point, with dark shades in the background. Im happy with this, but I think black and white presets are a difficult thing, because B&W always looks good to me , but when I shoot stuff like this I want to bring out the grass in the middle of the photo a bit more, make it more defined, I think it looks a bit blurry and could be a bit more sharp, maybe I was using the wrong preset, if you know a better sleeklens preset, holla at your boy! –
_MG_7479
– Before a Preset is applied –
TtW|0_All In ONe - Warm Shadows 2-1
– Preset used: TtW|0_All In ONe – Warm Shadows – this was a bit of a wild card photo, I wanted to snap something that had a busy foreground and also movement in the back of the shot. I wanted a  Preset that used the clarity tool on the leaves to help define them a bit more, while at the same time not distorting the people in the back, I want it to be quite a shallow depth of field and not do anything to crazy, just highlight a few colour, I would say this has done this pretty well –

I’m pretty happy with the outcome of these photos and think these presets are going to be a really handy tool for when I’m doing these posts. Will I use it everyday? No. probably not, I enjoy editing photos and the process that I go through to get these posts online, but when its 1 in the morning, I’ve been working all day, and just want to get to sleep, these presets are going to be a life saver.

They could also be a valuable tool in learning how Lightroom works, choose a preset you like and then work backwards from there, how did the preset use the clarity or White balance to get your desired effect? To finish off and not to sound like some rambling on blog, look into these presets and figure out how or when you would use them, I think they are something every photographer should have in their inventory, but not a necessity.

Overall I would say Sleeklens is an 8/10 and definitely has a professional feel to them, Heres a link to their website go check it out and see if they are any good for you, if you have any more questions about this, let me know and ill be happy to answer any questions, or if you think i’m completely wrong let me know too.

Check out these links to SleekLens and also some of the stuff they get up to, its a great idea and is a game changer for when you need photos edited quickly and without losing that professional feel.

https://sleeklens.com/product/landscape-lightroom-presets

https://sleeklens.com/product/professional-photo-editing-service

https://sleeklens.com/product-category/lightroom-presets